Maximize your profit by copy Our Trade
1. What is Order Flow?
Order Flow shows where buy and sell interest accumulates at specific price levels. An order block (or order flow imbalance) is an area where large numbers of buy or sell orders clustered previously — these often act as strong support or resistance.
2. Why order flow matters
It reveals where other traders (or institutions) placed orders before.
Order blocks often cause price to reverse or accelerate when price returns to them.
Trading with order flow gives an edge: you trade where liquidity and opposite orders are likely to appear.
3. How order blocks form
Price moves strongly in one direction (large bullish or bearish candle(s)).
That move leaves behind an area where one side (buyers or sellers) was overwhelmed. Traders who lost that battle will often place orders there later.
When price returns to that area, those resting orders and the new counter-orders create notable reactions (bounce, rejection, or continuation).
4. How to spot an order block on your chart — step by step
Switch to a clean chart: remove noisy indicators; use price candles only.
Find strong directional moves: look for large candles or a series of candles moving in the same direction.
Mark the last swing before the big move: the candle(s) that began the strong move form the order block zone (often the high/low of that candle range).
Draw a rectangle (zone) around the wick extremes of that candle(s) — this is your order block zone.
Confirm with price reaction: if price returns to that zone and shows rejection (pin bar, engulfing, or a cluster of small candles), the zone held as an order block.
Optional confirmation: look for increased volume/tick activity at that zone (if your platform has reliable data) or observe multiple bounces/retests in the past.
5. Trade setup rules (simple and conservative)
Follow these rules to place trades using order blocks.
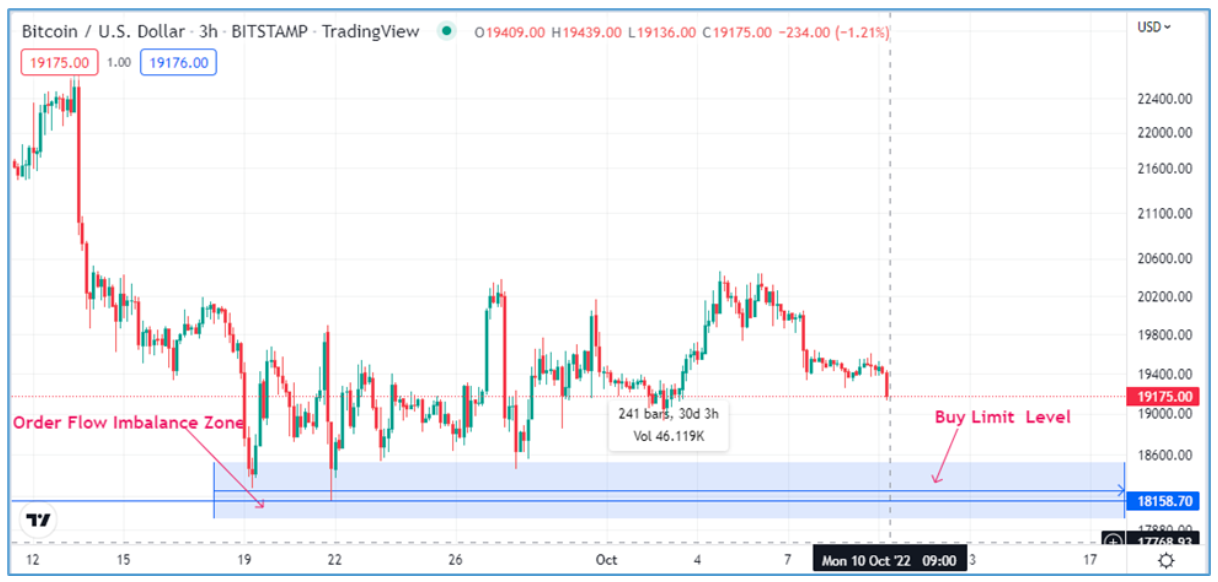
A. For a BUY using a bullish order block (demand)
Identify a bullish order block — zone created before a large upward move.
Wait for price to return to the zone and show signs of buying (rejection candle, double bottom, bullish engulfing).
Enter with a buy limit inside the zone (or on a small pullback/retest).
Place stop loss a few pips below the zone low (give it breathing room — account for spread and volatility).

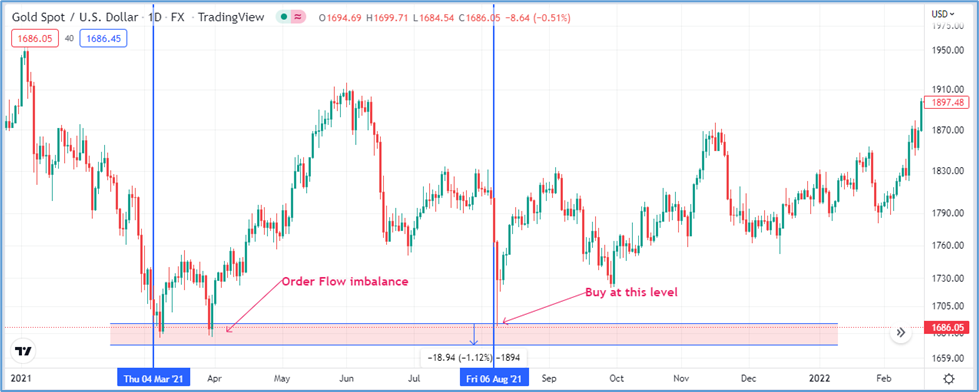
Set a take-profit at the next logical resistance, previous swing high, or use a risk:reward ratio (e.g., 1:2 or 1:3).
Manage the trade: move stop to breakeven when price reaches 50% of your target; scale out partial position if you prefer.
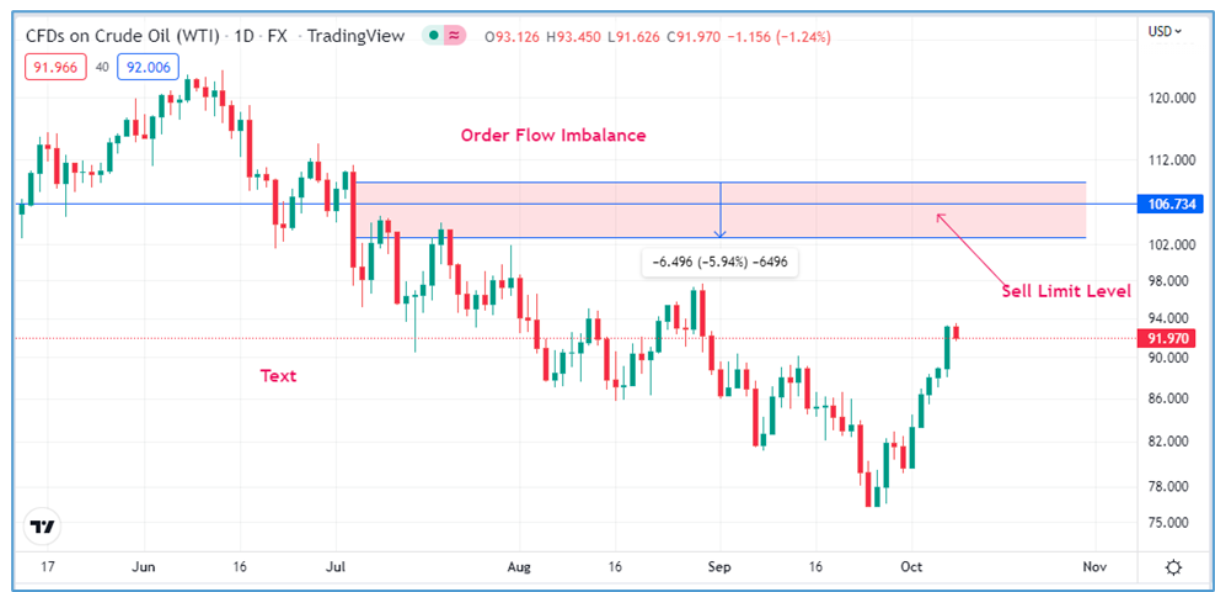
B. For a SELL using a bearish order block (supply)
Identify a bearish order block — zone created before a large downward move.
Wait for price to return and show rejection (pin bar, bearish engulfing, failed breakout).

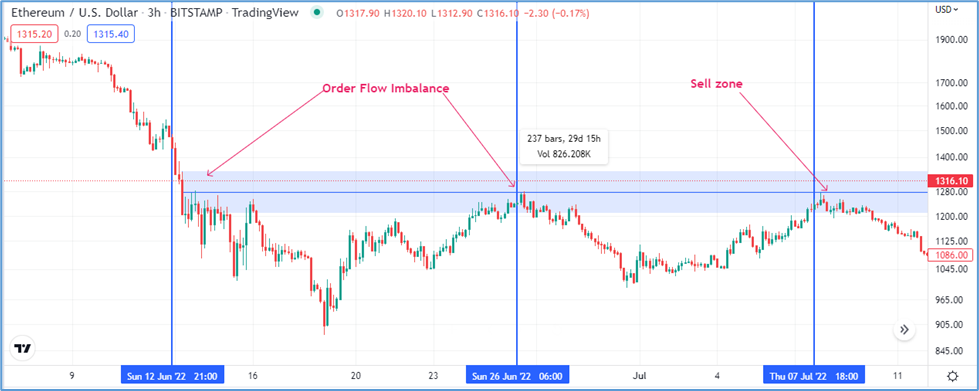
Enter with a sell limit inside the zone.
Place stop loss a few pips above the zone high.
Set take-profit at the next support or use a fixed R:R.
Manage the trade similarly (move stop to breakeven, partial profit-taking).
Trade Now
6. Extra confirmation tools (optional)
Volume / tick data: helps confirm if real order activity matched the block (more reliable in centralized markets).
Price action signals: pin bars, engulfing candles, inside bars at the zone.
Market structure: confirm the overall trend — trading with the higher-timeframe trend increases probability.
7. Timeframes & multi-timeframe approach
Use a higher timeframe (H4 / Daily) to identify major order blocks and a lower timeframe (H1 / M15) to time entries.
Larger timeframe blocks are stronger; they attract more liquidity and give safer entries.
8. Risk management & position sizing
Never risk more than a small percent of your account on a single trade (commonly 0.5%–2%).
Calculate position size using distance between entry and stop loss.
Account for spread/slippage: widen stop or avoid entering during low-liquidity hours.
9. Common mistakes to avoid
Drawing overly wide or vague zones — be precise.
Ignoring the overall market trend — counter-trend trades need extra caution.
Placing stops too tight (get stopped out) or too far (risk too much).
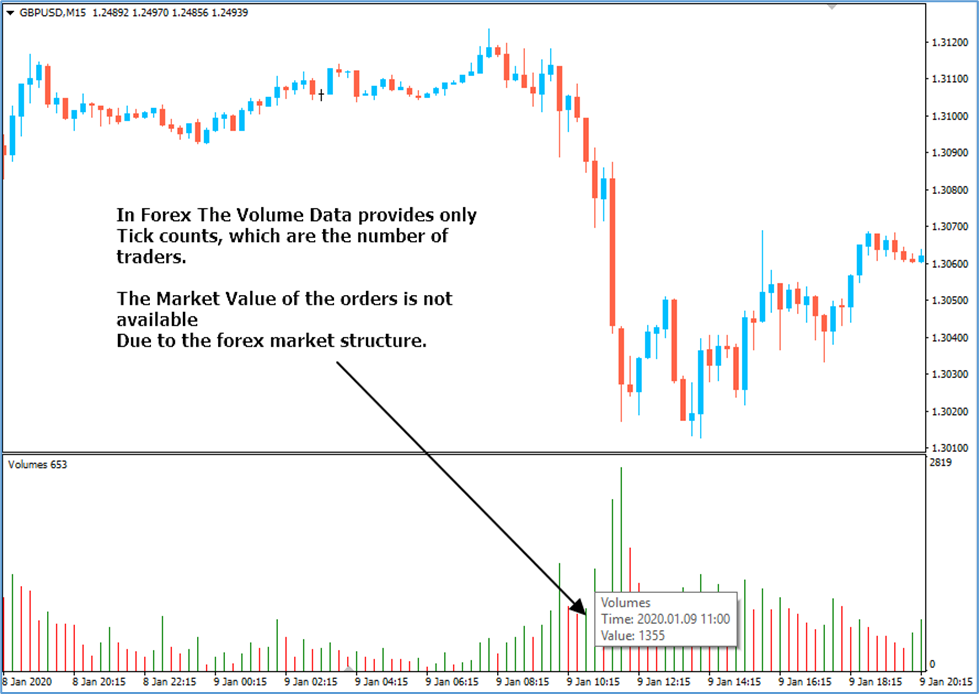
Overrelying on one confirmation tool; combine price action, structure, and volume when possible.
10. Example trade templates
Buy template
Setup: Price returns to bullish order block on H4
Entry: Buy limit inside block on H1 rejection candle
Stop: 10 pips below block
Sell template
11. How to test & practice
Backtest: mark order blocks on historical charts and record what happens when price returns.
Demo trade: apply the rules on a demo account until you have consistent results.
Journal: keep a trade log — entry, stop, result, reason for the trade, and lessons learned.
Quick FAQ for beginners
Q: Are order blocks a guaranteed edge? A: No. They increase probability but are not 100% certain. Use stops and risk management.
Q: Do order blocks work in Forex? A: Yes — they work via price action and tick data. Volume in forex is broker-specific, so rely primarily on price reactions and multiple confirmations.
Q: How many pips for stop? A: It depends on volatility and timeframe. Base it on the zone size and average ATR.
Recent Posts
- What is a Cent Account?
- Smart Money Concepts: Mastering Mitigation Blocks, Breaker Blocks & QML
- Understanding ICT Reclaimed Order Blocks: How Institutions Control Market Moves
- How to Trade Consolidations in Forex and Other Markets
- How to Identify Real Forex Traders vs Fake Screenshot Gurus
- The Gold Accumulation System – A Safe Buy-Only Strategy for Cent Accounts
- The Dark Side of Forex: How Screenshot Scammers Trap New Traders
- CHOCH vs MSS: The Exact Difference Every Smart Money Trader Must Know
- Gold Buy-and-Hold Strategy Using Cent Account and Compounding Lot Size (No SL Trading Model)
- How to Trade Order Flow Imbalances: Simple Rules for Spotting Buy & Sell Order Blocks
- Copy Our Long-Term Gold Trading Strategy
- Execution Mode vs Outcome Mode — The Professional Approach to Managing Trades
- How I Achieved 80.95% Profit in One Year on HFM Copy Trading
- Why It Took Me 15 Years to Become a Profitable Trader
- How to Read and Interpret Profit Factor in Forex Backtesting
- Understanding the Institutional Accumulation Channel
- Understanding No-Deposit Bonuses in Forex: What You Need to Know
- XAUUSD Analysis Summary
- Gold Price Surge Summary
- XAU/USD(GOLD) Analysis 07/10/2025
- Gold Market Update 07/10/2025
- Gold(XAUUSD) Market analysis 07/10/2025
- Start your journey to Forex success
- আপনার ফরেক্স সফলতার যাত্রা শুরু করুন
- 7 Money Rules for Financial Awareness and Peace of Mind
- Gold Recovers Ahead of Nonfarm Payrolls: Key Insights
- Weekly Market Wrap: Gold Pulls Back Amid Dollar and Bond Rotation
- Copy Our Trade with OneRoyal
- Finding Your Path: How to Choose the Perfect Forex Mentor for Success
- Experience the Stability of a 100% Secure Trading Account!
- The 100% Profitable Trading Approach: Maximize Gains with Minimal Risk
- The Head and Shoulders Chart Pattern
- Bullish and Bearish Rejection Blocks: Identifying Key Trading Opportunities
- Just Market: Is It Worth Your Time and Money?
- Why LiteFinance Stands Out: A Comprehensive Review
- Understanding XAUUSD: Gold Strategy and Central Bank Reserve Management
- Hotforex Copy Trading Service
- Understanding Profit Factor: A Key Metric for Trading Success
- Supply and Demand Dynamics: How Gold Production Affects XAUUSD
- The Safe Haven: Gold as a Strategic Investment During Economic Downturns
- Mastering Deception: How to Scam as a Forex Signal Provider
- The Impact of Rising Bond Yields on Gold (XAUUSD)
- Understanding the Correlation Between Oil Prices and Gold (XAUUSD)
- The Impact of Geopolitical Events on Gold Demand (XAUUSD)
- Fundamental Strategy Overview: XAUUSD (Gold)
- Understanding the Role of Gold (XAUUSD) as an Inflation Hedge
- How Central Bank Interest Rates Influence Gold Demand
- Gold Holding Trading System
- From Novice to Pro: Navigating the ICT Propulsion Block in Trading
- Single Candle Order Block


