


Maximize your Profit by copy our Trade
Money management and risk management are key aspects of trading with supply and demand zones.
There is nothing more important than having the right money management skills. For a full article on money management, you can visit this page, where I talk about it extensively.
For the sake of this article, I would just share with you that no matter how appealing a trade looks like, you should always abide to your trading rules.
No exceptions!
No second chances!
Just the right amount of risk per trade.
I have detailed a whole system of how to properly manage your risk. It is part of my trading course, so if you are interested, you can pay it a visit. I usually like to minimize risk while increasing the return possibility and the system I have built does help me in that a lot!
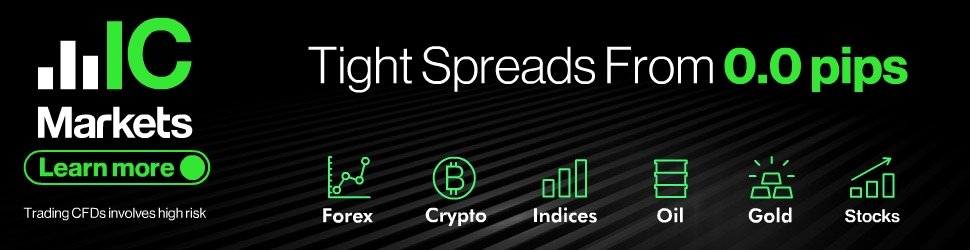
Let’s continue with another example of supply zones and price action.
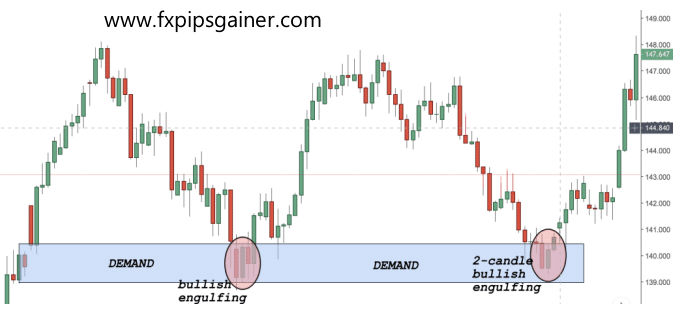
What you need to consider when trading with supply and demand zones is that the reliability of a signal is often in a direct relationship with its frequency. In other words, the less often a certain pattern occurs, the higher its reliability could be.
Let’s have a look at another supply zone example with price action.
In this example above, I have chosen a supply zone that is in the middle of a range. As you can see, it is as powerful as if it was in the extremities of a range.
– The first sell trigger came when price action printed a two-candle bearish engulfing pattern.
– The second sell-trigger came when price printed another two-candle bearish engulfing
pattern.
It usually takes more experience to see a supply or demand zone in the middle of a range than to spot it at the extremities. One way or another, location is less important than the zone itself.
It does not really matter where it forms, as long as it forms.
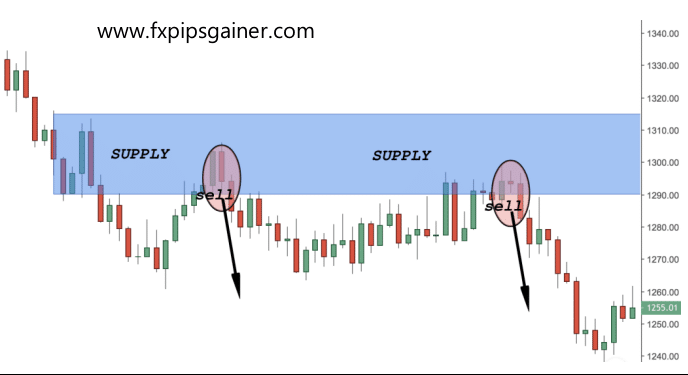
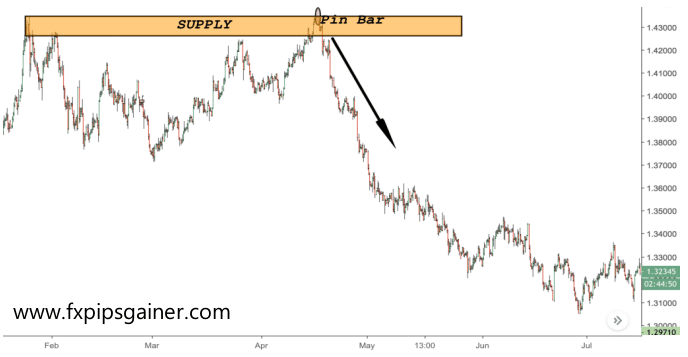
In this example above you see a potential trading setup that would have given almost 1:6
risk:reward ratio just from a daily chart point of view.
Considering that you can fine-tune your entry from the 4H chart, this could have been an even
bigger winner.
As you can see from the charts above, this could have been one unbelievable trade if you followed those rules. I managed to take this trade and stayed within it for quite some time. It is extremely hard to hold onto this trade until the very end, but even with a fraction of this move, you could have made a fortune.
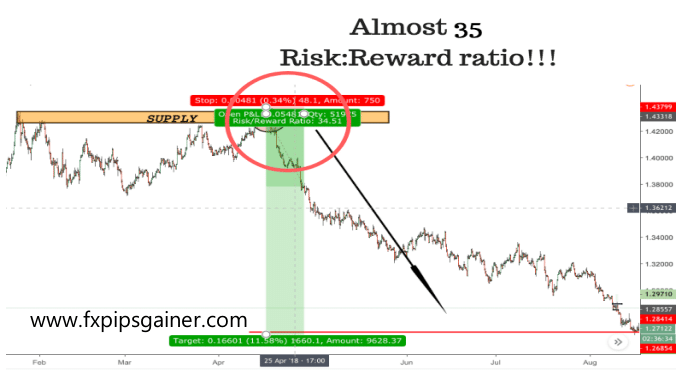
Let’s try to look into a potential risk: reward scenario if you have managed to stay for the duration of the whole move:
This incredible 1:35 risk:reward ratio is almost unbelievable!
Even if you managed to stay in this trade for just 1/3rd of the move, you would have made over 10 times your risk.
This return is achieved even without scaling in- just from ONE SINGLE TRADE!
I do usually use scaling in with my trading strategy, which would have magnified the trading
results!
The beauty of my trading strategy is that it also helps you stay away from unprofitable trades by minimising the effect of the losing trades.
All in all, trading a combination of supply and demand zones with price action does really perform spectacularly well.